How To Connect SSH IoT Device Over Internet AWS Using Windows: A Step-by-Step Guide
So, you're here because you want to know how to connect SSH IoT device over internet AWS using Windows, right? Let me tell you something, buddy—you’re in the right place. This isn’t just about setting up an IoT device or fiddling with AWS; it’s about unlocking the potential of your tech stack. Imagine being able to control your IoT devices from anywhere in the world using SSH over AWS. Sounds cool, doesn’t it? Well, it IS cool, and we’re about to break it down step by step so even if you're a beginner, you'll feel like a pro by the end of this.
Connecting SSH IoT devices over the internet through AWS can be a game-changer for both hobbyists and professionals. Whether you're building a smart home system, monitoring remote sensors, or just experimenting with cool gadgets, understanding how to use AWS to connect these devices is essential. And hey, don’t worry if you’re not a tech wizard yet—we’ll guide you through every single step.
Before we dive deep, let’s set some expectations. This article isn’t just a random tutorial; it’s packed with practical tips, insider tricks, and real-world advice. We’ll cover everything from setting up your AWS environment to configuring your IoT device—all while keeping things simple enough for anyone to follow. So buckle up, grab a coffee, and let’s get started!
- Mackenyu Aratas Wife Unveiling The Mysterious Beauty
- Uncovering The Truth The Children Of Katt Williams
Table of Contents:
- Introduction to SSH IoT Device Connection
- Setting Up Your AWS Environment
- Preparing Your Windows Machine
- Understanding Your IoT Device
- SSH Basics for Beginners
- Connecting SSH via AWS
- Security Best Practices
- Common Issues and Troubleshooting
- Optimizing Performance
- Wrapping It Up
Introduction to SSH IoT Device Connection
Alright, let’s start with the basics. What does "SSH IoT device over internet AWS using Windows" even mean? SSH stands for Secure Shell, and it’s basically a secure way to remotely access and control another computer or device. When we talk about IoT devices, we’re referring to those nifty little gadgets that can connect to the internet—things like sensors, cameras, or home automation systems.
Now, why AWS? Well, Amazon Web Services is one of the biggest cloud platforms out there, and it offers tons of features that make managing IoT devices over the internet a breeze. By combining SSH with AWS, you can create a secure tunnel that lets you control your IoT devices from anywhere in the world, as long as you have an internet connection.
- Justin Biebers Connection To Odell Beckham Jr A Dynamic Duo
- The Shocking Truth How Guy Fieri Shed Pounds With Weight Loss Secret
And guess what? You don’t need a Mac or Linux machine to do this. Yep, you can totally set it up on Windows, which is great news for all the PC enthusiasts out there. So whether you’re running Windows 10, 11, or even older versions, we’ve got you covered.
Setting Up Your AWS Environment
Let’s talk about the first big step: setting up your AWS environment. This is where the magic happens, folks. You’ll need to create an AWS account if you haven’t already, and then set up a few key components.
Creating an AWS Account
First things first, head over to the AWS website and sign up for an account. It’s free to start, and you’ll only pay for what you use. Once you’re logged in, navigate to the EC2 dashboard. EC2 is Amazon’s Elastic Compute Cloud service, and it’s where you’ll launch the virtual machine that will act as your SSH server.
Launching an EC2 Instance
Now, let’s launch an EC2 instance. Choose an Amazon Machine Image (AMI) that suits your needs—Ubuntu is a popular choice for beginners. Make sure to select a t2.micro instance type, as it’s eligible for the free tier. Configure the instance settings according to your preferences, and don’t forget to create a key pair. This key pair will be used to authenticate your SSH connection.
Here’s a quick checklist:
- Select the right AMI (e.g., Ubuntu).
- Choose a t2.micro instance type.
- Create and download your key pair.
- Set up security groups to allow SSH traffic.
Preparing Your Windows Machine
Now that your AWS environment is ready, it’s time to prep your Windows machine. You’ll need a few tools to make this work smoothly.
Installing PuTTY
PuTTY is a free SSH client that works great on Windows. Download and install it from the official website. Once installed, open PuTTY and enter the public IP address of your EC2 instance. Use port 22 for SSH and load your private key when prompted.
Configuring Firewall Settings
Don’t forget to adjust your Windows firewall settings to allow outgoing SSH connections. This is usually pretty straightforward, but if you’re unsure, there are plenty of tutorials online that can guide you through the process.
Understanding Your IoT Device
Every IoT device is different, but most of them will require some form of network configuration to connect to the internet. Whether you’re working with a Raspberry Pi, an ESP8266, or any other device, make sure it’s properly connected to your local network.
Here’s a quick rundown of what you’ll need:
- Ensure your IoT device has a static IP address.
- Configure port forwarding on your router if necessary.
- Install any required software or libraries on your device.
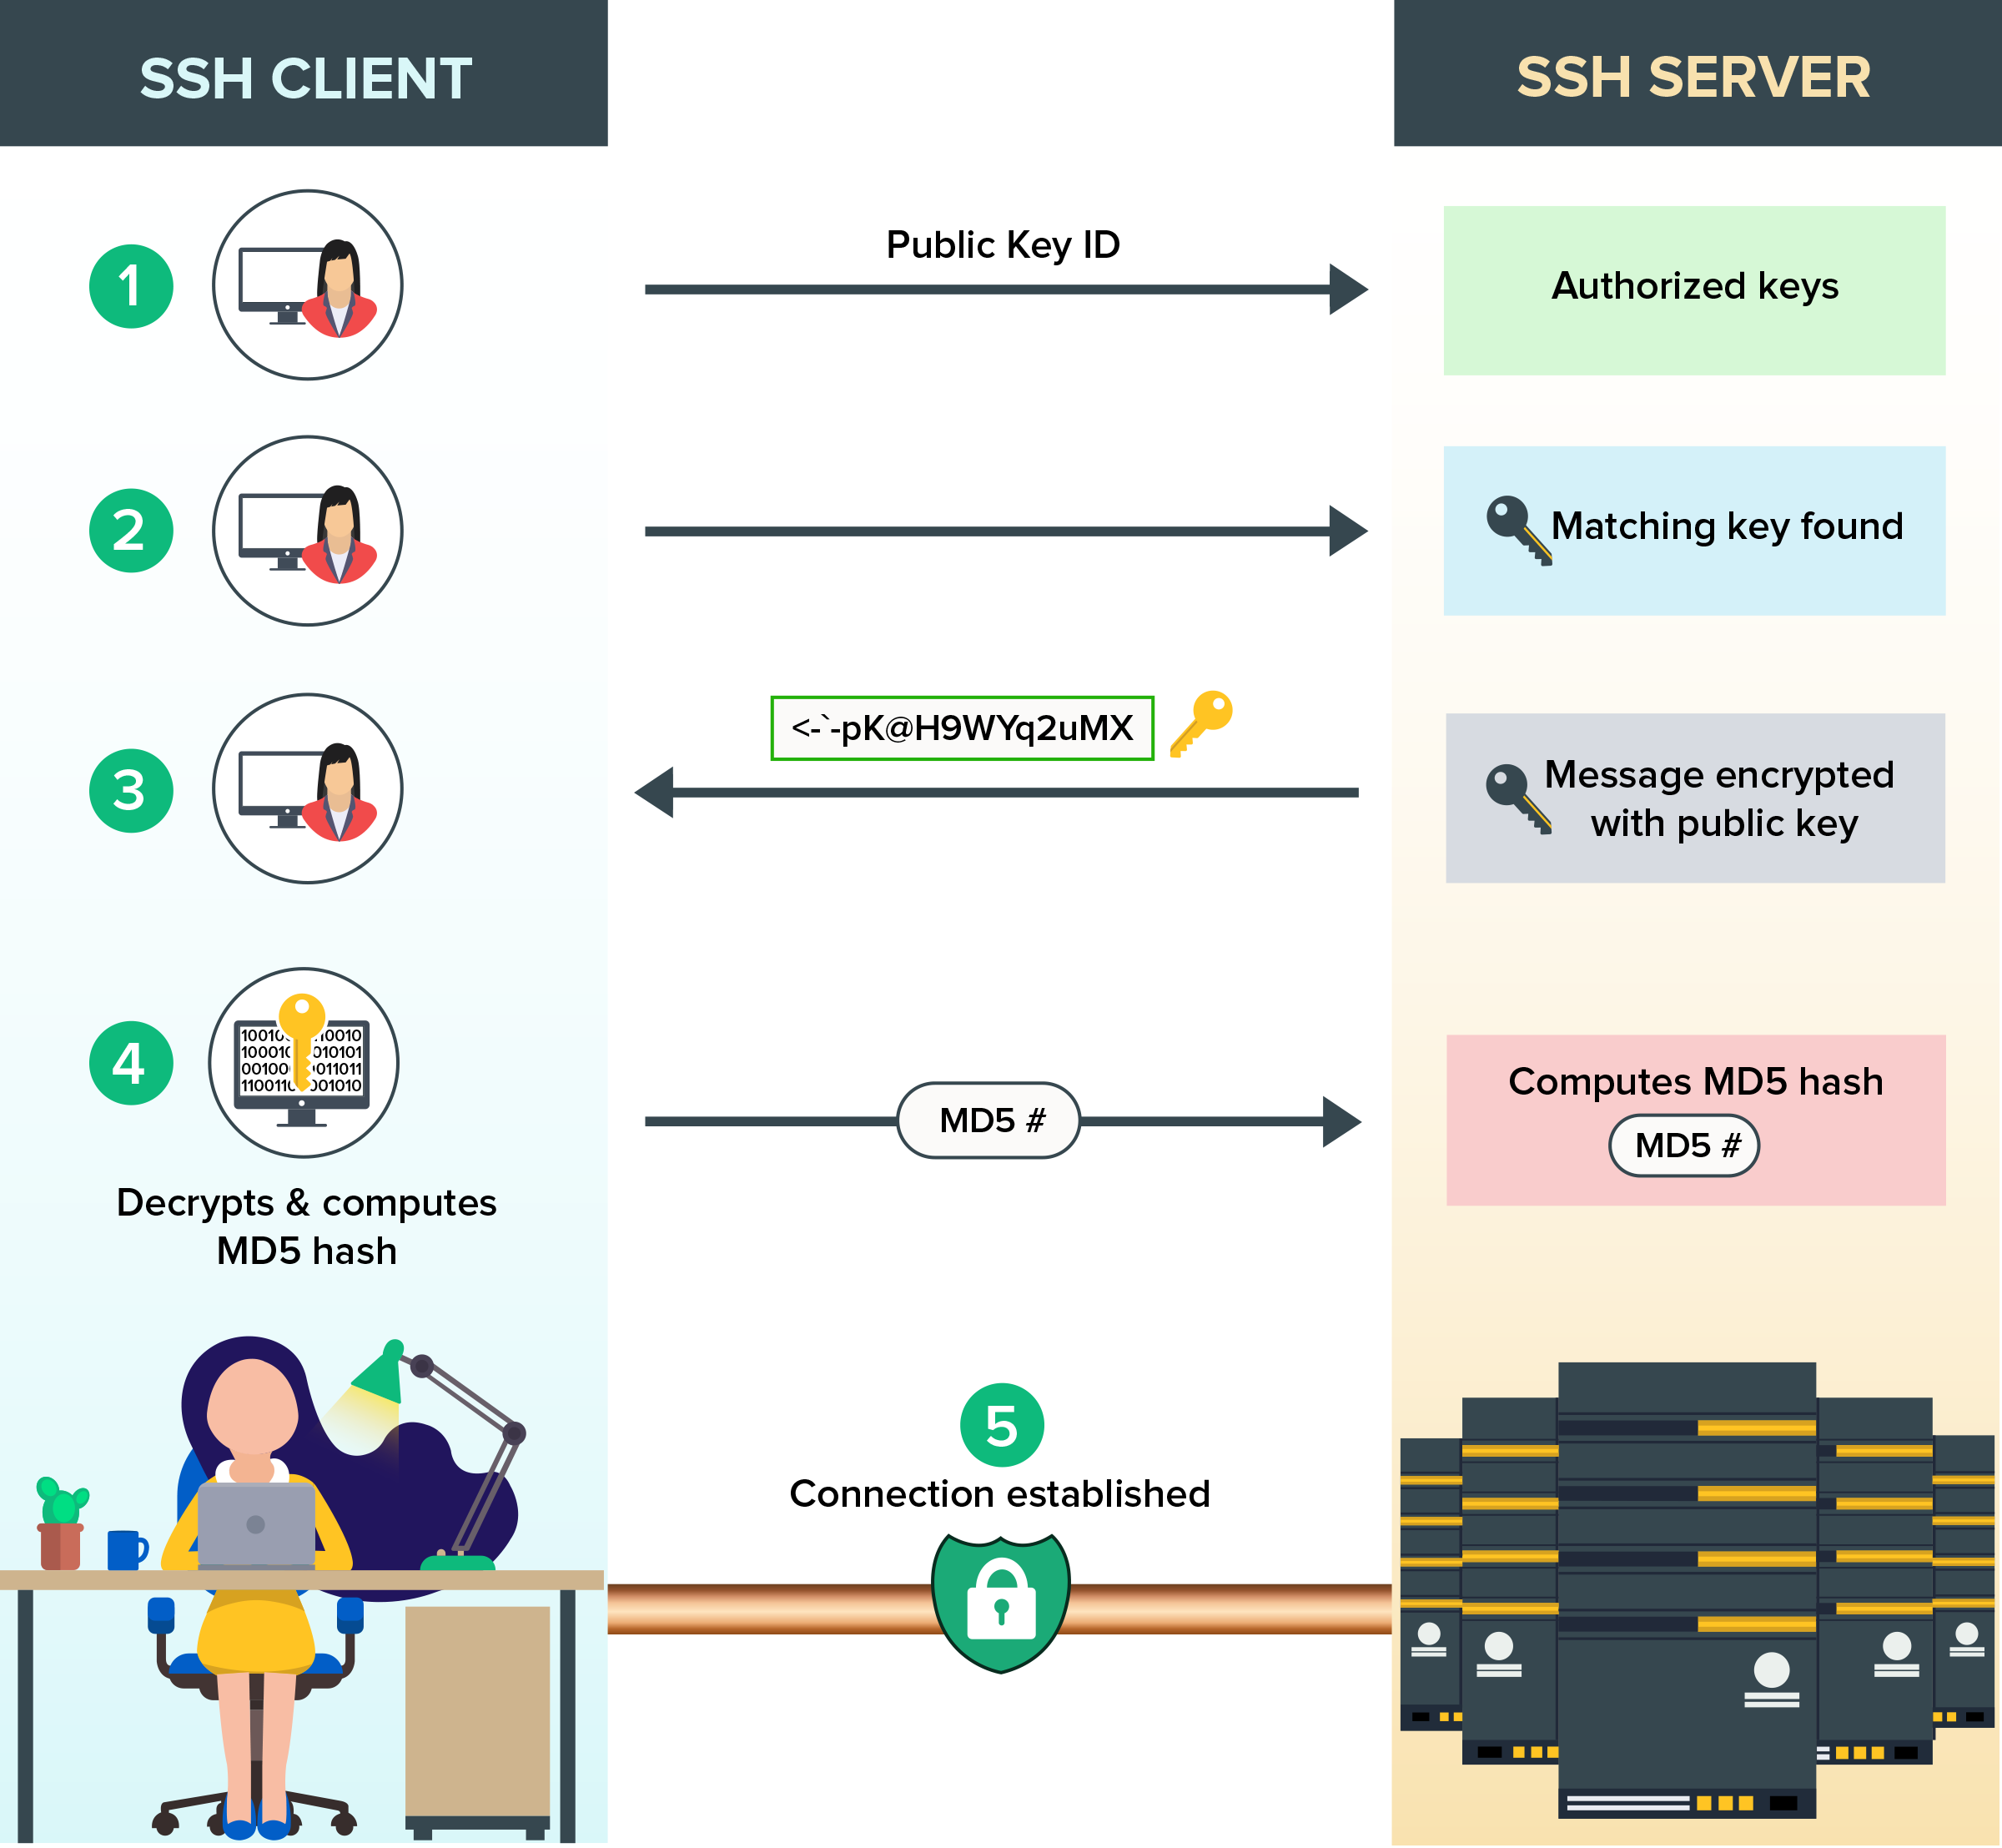
SSH Basics for Beginners
If you’re new to SSH, don’t worry—it’s not as scary as it sounds. SSH is essentially a protocol that allows you to securely communicate with another device over the internet. You’ll use commands in the terminal to interact with your IoT device, and PuTTY will handle the heavy lifting on Windows.
Some basic SSH commands you’ll want to know:
ssh username@ip_address– Connect to a remote server.scp file_path username@ip_address:/destination– Transfer files securely.exit– Disconnect from the SSH session.
Connecting SSH via AWS
Finally, it’s time to connect your IoT device to AWS using SSH. This is where everything comes together. Follow these steps carefully:
Step 1: SSH into Your EC2 Instance
Use PuTTY to connect to your EC2 instance. Enter the public IP address, select port 22, and load your private key. Once connected, you’ll be logged into your virtual machine.
Step 2: Forward Traffic to Your IoT Device
From your EC2 instance, you can now establish a connection to your IoT device. Use the internal IP address of your device and forward the necessary ports. This will allow you to control your IoT device remotely via the SSH tunnel.
Security Best Practices
Security is paramount when working with IoT devices over the internet. Here are a few tips to keep your setup safe:
- Use strong, unique passwords for all accounts.
- Regularly update your software and firmware.
- Limit access to trusted IP addresses whenever possible.
- Monitor your logs for suspicious activity.
Common Issues and Troubleshooting
Even the best-laid plans can hit a snag. Here are some common issues you might encounter and how to fix them:
- Connection Refused: Double-check your IP addresses and ensure all firewalls are configured correctly.
- Authentication Failed: Verify your key pair and make sure it matches the one on your EC2 instance.
- Timeout Errors: Check your internet connection and ensure your router is configured properly.
Optimizing Performance
Once everything is up and running, you might want to optimize your setup for better performance. Here are a few tips:
- Use compression to speed up data transfer.
- Enable keepalive options to prevent disconnections.
- Monitor resource usage on your EC2 instance to avoid bottlenecks.
Wrapping It Up
And there you have it, folks! You now know how to connect SSH IoT device over internet AWS using Windows. It’s not as complicated as it seems, and with a bit of practice, you’ll be able to manage your IoT devices like a pro. Remember, security is key, so always follow best practices to protect your setup.
So, what are you waiting for? Give it a try and see how powerful this setup can be. And if you found this guide helpful, don’t forget to share it with your friends or leave a comment below. Happy hacking, and stay tech-savvy!


Detail Author:
- Name : Prof. Nicola McGlynn I
- Username : stacey.towne
- Email : quinton17@nolan.com
- Birthdate : 1979-06-05
- Address : 27932 Dach Lake Carrollhaven, IN 14439
- Phone : +1.215.749.2820
- Company : Kub Group
- Job : Insulation Worker
- Bio : Sed voluptatum incidunt provident mollitia expedita ex in. Repellat rerum et iusto deleniti aut rerum. At earum corporis sint quis. Sint vel facilis a dolorum eaque commodi qui.
Socials
linkedin:
- url : https://linkedin.com/in/johnson2011
- username : johnson2011
- bio : Voluptates amet vel provident sed.
- followers : 1257
- following : 221
twitter:
- url : https://twitter.com/johnsond
- username : johnsond
- bio : Amet qui quas asperiores voluptas porro quas aliquid. Aut iste maxime maiores dolor. Sunt laudantium asperiores doloremque est.
- followers : 1984
- following : 1085
instagram:
- url : https://instagram.com/dinajohnson
- username : dinajohnson
- bio : Non quo quaerat rem animi. Sint dolorem saepe voluptatem quo. Eos dolore corporis facere ut id.
- followers : 5818
- following : 2583
facebook:
- url : https://facebook.com/dina6503
- username : dina6503
- bio : Ullam eligendi illo et nostrum aperiam dignissimos omnis minus.
- followers : 6682
- following : 1478
